EdSpace Help
Quick-Start Guide
Topics:
- Signing into your EdSpace site
- Changing your EdSpace password
- Using the dashboard and toolbar
- Choosing and activating a site theme
- Pages vs. Posts
- Creating pages
- Creating posts
- Using featured images
- Site visability and security options
- Adding other users to your site
- Adding widgets to your site
- Creating a site navigation menu
Signing into your EdSpace site
If you have not signed into EdSpace before, you must use the login link you recieved via email. You will need to set your password before continuing.
- From the EdSpace homepage, click the Log in/Dashboard button.
- Enter your EdSpace username and password and click Log In.
- Use the My Sites menu at the top-left of the WordPress admin homepage to access the Dashboard for your EdSpace site(s).
Changing your EdSpace password
- From the EdSpace homepage, click the Log in/Dashboard button.
- Log in with your EdSpace username and password. If this is the first time you’re accessing EdSpace, you must use the login link sent via email.
- Move your mouse over the user account icon in the top-right and click your username.
- Scroll down to the Account Management section.
- Click the Set New Password button.
- Enter your new password. Choose a password or phrase that you will remember, including numbers, letters, and symbols. American University requires Medium or Strong passwords, as indicated by the strength meter.
- Click on the Update Profile button to save your changes.
Using the dashboard and toolbar
The WordPress dashboard is the main hub for all admin actions on your EdSpace site. You can use the left-hand menu to adjust your site’s appearance, add content, manage comments, add users, and more. The toolbar across the top includes quick-links to view the live version of your website (View Page), configure your active theme (Theme Options), and create new content items (+New). Use the My Sites menu at the top-left to switch between admin panels for any EdSpace site to which you have access.
Choosing and activating a site theme
A site theme defines the overall look and feel of your EdSpace site. There are currently over 35 themes pre-installed on the EdSpace platform for you to choose from. Please note: most themes are blank when activated and require some configuration to display properly. The following instructions explain how to activate a theme on your site and begin the configuration process. However, every theme has a different configuration menu, so you’ll need to investigate its included theme admin menu to see your available options.
To set your site theme:
- From your site’s admin Dashboard, click the Appearance menu item on the left-hand side.
- You will see the list of available themes along with a small thumbnail that shows a generic site image with that theme applied.
- Click the Live Preview button to see your current site with that theme applied. This does not activate the theme, it only allows you to see what the theme looks like without saving any changes. If your site doesn’t have much content yet you may not see all of the theme’s capabilities.
- When you find a theme that you want to try, click its Activate button.
- Once the theme is applied, you can access the various configuration options through the Appearance -> Customize menu link.
- Most modern WordPress themes include the main settings categories for your site:
- Site Identity – set the site title, tag line, and the favicon.
- Header – set the header image and general style.
- Menus – set the location of navigation menus.
- Widgets – configure the location and behavior of available site widgets.
- Homepage settings – choose a page to display as the site homepage.
- Footer – change the settings for the global site footer.
- When you’re done customizing the theme, click the Publish button to save your changes. Click the X button in the top-left to cancel all changes.
Pages vs. Posts
Posts are content entries listed in reverse chronological order on your site. Think of them as articles or updates that you share to offer up new content to your readers. They are the traditional “blog” style of content delivery. You can display posts on your site in different ways, such as by using the Blog Posts block or by setting a default posts page at Customize -> Homepage Settings.
If you have marked any posts as sticky, they will appear as pinned to the top of your blog before any other posts, regardless of their chronological order.
The URL for a post looks like this by default:
https://edspace.american.edu/2021/01/01/post-title/
See the WordPress Posts Tutorial for more detailed information.
Pages are static content entries and are not affected by date. Think of them as more permanent fixtures of your site (an About page, a Contact page, and a Home page). You may also have a “Blog” page which is used to display your posts. Pages are typically listed in your site’s navigation menu.
The URL for a page looks like this by default:
https://edspace.american.edu/page-title/
See the WordPress Pages Tutorial for more detailed information.
Creating pages
- Log into the admin Dashboard for your EdSpace site.
- On the left-hand menu, click Pages -> Add New.
- Enter the page title.
- In the main content box, add your page content (text, images, embedded videos, etc.) using the editing tools.
- When you’re done, click the Publish button at the top-right to save your changes. This will immediately activate the page and publish your content.
- This page, and any other you’ve created, will be shown in the Pages -> All Pages menu link. Click the title of any page to re-enter the editor.
Creating posts
- Log into the admin Dashboard for your EdSpace site.
- On the left-hand menu, click Posts -> Add New.
- Enter the post title.
- In the main content box, add your post content (text, images, embedded videos, etc.) using the editing tools.
- Choose the desired Category for the post. If you need to create a new category, click the +Add New Category button. Categories help with site navigation and post archiving.
- Add any desired tags to the Tags section on the bottom-right. This will help filter and organize your posts.
- When you’re done, click the Publish button at the top-right to save your changes. This will immediately activate the post and publish your content.
- This post, and any other you’ve created, will be shown in the Posts -> All Posts menu link. Click the title of any post to re-enter the editor.
Using featured images
A featured image is available as an additional feature when creating a post. In most themes it will display above the post as a banner image, but some themes may not use the default placement. To add a featured image to a post:
- On the left-hand menu, click Posts -> Add Posts.
- Click on the post title of the post you wish to edit.
- Scroll down to the Featured Image section on the left-hand side and click Set Featured Image.
- If you need to upload a new image, click the Upload Files tab, click the Select Files button, and upload the media file from your computer.
- If you have already uploaded the image you wish to use, or after your uploaded image finishes loading, select it from the media gallery.
- When you’re done, click the Publish button at the top-right to save your changes.
Site visability and security options
By default, your EdSpace site will be visible to the world. If you’d like to restrict viewing access (even temporarily while you build out the site) you have a number of options:
- On the left-hand menu, click General -> Reading.
- Scroll down to the Site Visability section.
- Your options are as follows:
- Allow search engines to index this site – This is the default setting and makes your site visible to the entire internet. It also allows search engines (like Google) to index your site and provide links to it in search results.
- Discourage search engines from indexing this site – Your site is still visible to the entire internet, but search engines will not return links to your site as search results.
- Visitors must have a login – Your site is blocked from normal internet access. All visitors must log in with their EdSpace account to view the site.
- Only registered users of this blog can have access – Your site is blocked from normal internet access. All visitors must be registered users of your specific EdSpace site. You can find a list of authorized users from the Users -> All Users menu link on the left-hand side.
- Only administrators can visit – Your site is blocked from normal internet access. Only users listed as administrators on your EdSpace site can see the content. You can find a list of administator users from the Users -> All Users menu link on the left-hand side.
- Anyone that visits must first provide this password – Your site is blocked from normal internet access. All visitors must enter the password you specified before they can view the site.
- When you’re done configuring the options, click the Save Changes button at the bottom.
Adding other users to your site
You can add other EdSpace users to your site so they can view, edit, or help you administer your content. You’ll need to know their EdSpace user account name or AU email address.
- On the left-hand menu, click Users -> Add New.
- Under the Add Existing User section enter the user’s AU email address or EdSpace username.
- The search field will show you a pop-up of the user account once it finds it in the EdSpace user list.
- Click on the user account in the pop-up to add their name to the field.
- Choose a role for the new user:
- Administrator – Full access to the site and its settings.
- Editor – Create, publish, and manage posts and pages, including those created by other users on the site.
- Author – Create, publish, and manage only the posts and pages that they have created.
- Contributor – Create and manage only the posts and pages that they have created, but can’t publish without Editor/Administrator approval.
- Subscriber – View access only, no editing or page/post creation abilities.
- If you don’t want EdSpace to email the user to let them know they’ve been added to your site, check the Skip Confirmation Email box.
- When you’re done configuring the options, click the Add Existing User button.
Adding widgets to your site
WordPress Widgets are a quick way to add content and features to your Sidebars, the space around the main content area on your site. Examples are the default widgets that come with WordPress – Categories, Tag Cloud, Navigation, Search, etc. Some plugins and themes will add their own widget areas and include a configuration menu to change the content and layout.
- On the left-hand menu, click Appearance -> Widgets.
- The left-hand side of the screen will show entries for all widgets available to use. The right-hand side of the screen will show the available widget areas in your selected theme.
- Expand the widget area in which you want to place a widget.
- Drag the desired widget into the expanded content area.
- Some widgets have configuration options you can set (title, number of items to display, etc.). Once you’re done configuring the widget, click the widget’s Save button.
- You can drag and drop widgets inside a content area to reorder them.
- To remove a widget, expand the widget item and click the Delete button.
- There is no Save button for the main widget page. You work is automatically saved when you move the widgets in and out of the various content locations.
Creating a site navigation menu
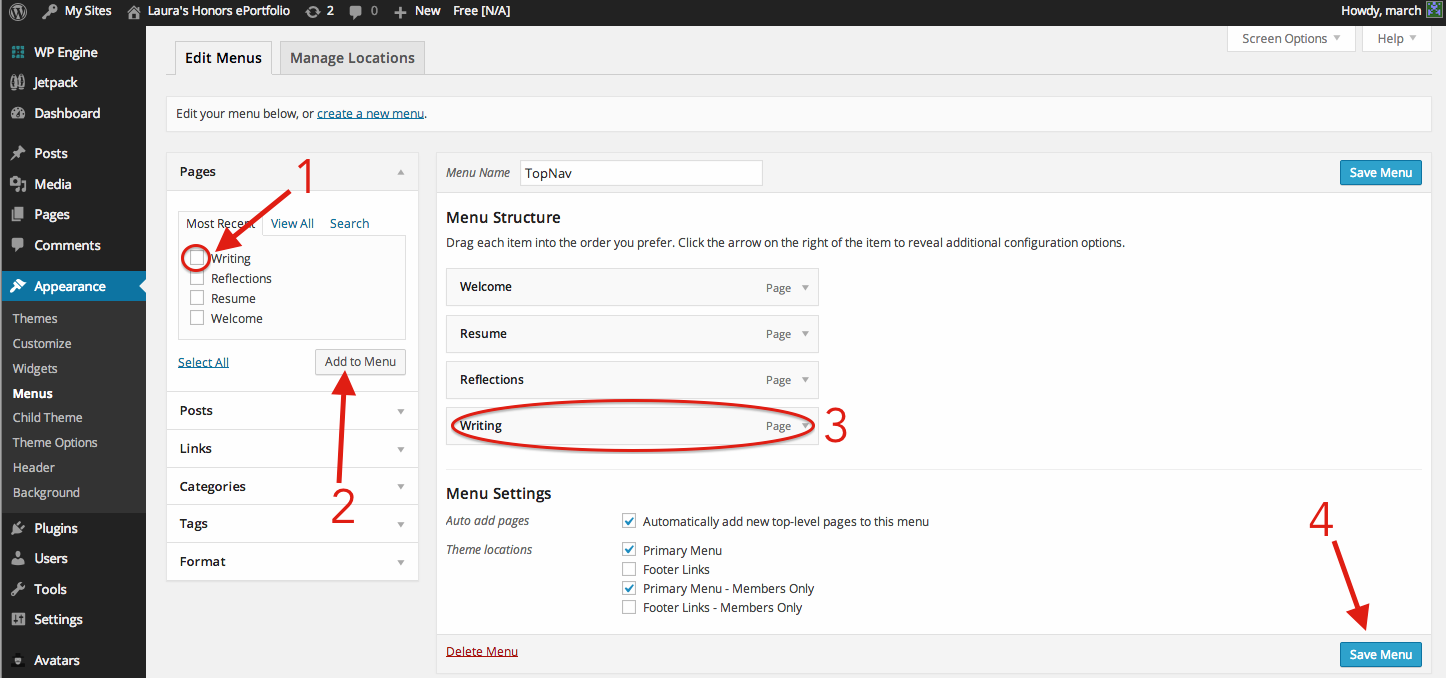
- Log into wp-admin Dashboard > Appearance > Menus.
- Select pages (to the left of the new Navigation menu section) that you’d like to be featured in the menu by (1) checking their corresponding boxes and (2) clicking “Add to Menu.”
- By Selecting/Clicking and Dragging, (3) arrange the order of navigational items. For items that should be “under” parent pages, drag them below and to an indent of their parent page.
- Select (4) “Save Menu” when you’re done.
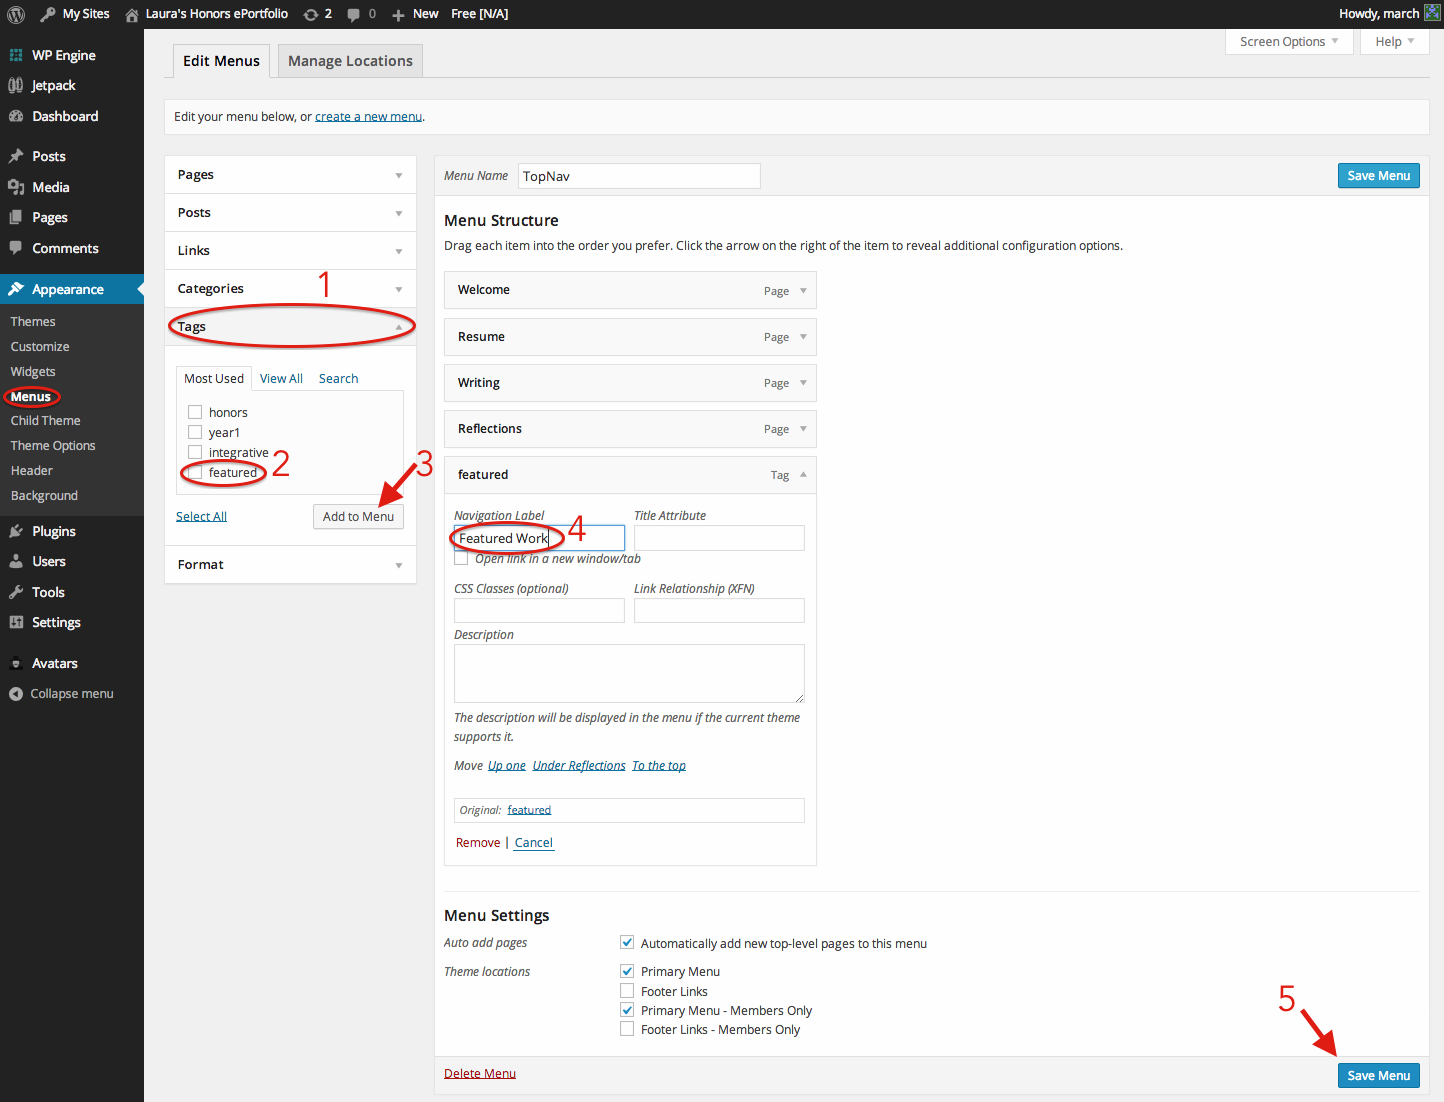
Add All Posts With a Specific Tag/Category to the Navigational Menu
Log into wp-admin Dashboard > Appearance > Menus.
- Select desired posts, links, categories, or (1) tags to make a navigational link directly to that content. For example, (2) selecting the “featured” tag checkbox and (3) selecting “Add to Menu” button will make a link to all the posts tagged “featured.”
- (4) To change the name of the Navigational link, select the down arrow to expand item, and rename its “Navigation Label.”
- By Selecting/Clicking and Dragging, arrange the order of pages. For pages that should be “under” parent pages, drag them below and to an indent of their parent page.
- Select (5) “Save Menu” when you’re done.